- はじめに
- git のインストールとログイン
- gitコマンドの使い方
- (1)ローカルフォルダ作成からやる場合
- (2)GitHubリモートリポジトリを作成してからやる場合
- GitHubでの personal access token(パーソナルアクセストークン)の設定
- gistのインストールとログイン
- gistコマンドの使い方
- 補足
- 参考資料
master => main に変更されたみたい(11 Feb 2021)
はじめに
GitHub は、ソフトウェア開発のプラットフォームである。また、ソフトウェア開発者のみならず、ソフトウェア・ユーザーにとっても、ほぼ必須といえる、コード共有のコミュニティでもある。
GitHubリポジトリにアクセスする際のAPIである git コマンド、手軽にコード公開・ファイル公開ができる gist サービスのAPI gist コマンドについて、それぞれのインストールから、実際の使い方までをまとめてみた。
GitHubは少しの間やらないと、すぐにコマンドを忘れてしまうのは困ったものだ、、、
実行環境
macOS Catalina (10.15.4)
MacBook Pro (12-inch, 2019, Four Thunderbolt 3 ports)
git のインストールとログイン
当然、事前に、GitHubのアカウントを持っているのが前提。
gitのインストール・コマンドの実行
いつもの、brew コマンドを使う。
#gitのインストール
brew install git

#パス確認
which git

#バージョン確認
git --version
はじめの設定
git config --global user.name "アカウント名"
git config --global user.email "登録メールアドレス"
git config --global color.ui auto

#設定の表示
git config -l
#credential.helper=osxkeychain
#user.name=アカウント名
#user.email=登録メールアドレス
#color.ui=auto
git をインストールした際に、git-credential-osxkeychainが自動的にインストールされるようで、user.name、user.emailを設定した後に、git config -lさえすればパスワード設定がされて、git コマンドが使える。
以下のコマンドでも同じ情報が確認できる。
#コンフィグの表示
cat .gitconfig


[user]
    name = アカウント名
    email = 登録メールアドレス
[color]
    ui = auto
[credential]
    helper = osxkeychain
ここから実際にgit APIを使っていくが、初めての時も久々の時も、git コマンドで何をやっているかイメージしづらい。
そのため、以下のイメージ画像を見ながら、実際のコマンド操作をやるとイメージしやすいだろう。

他の記事とかを読んでいると、やり方は、大別して2パターンある
(1)ローカルフォルダ作成からやる場合
(2)GitHubリモートリポジトリを作成してからやる場合
個人的には(2)推奨なのだが、いちおう、両方とも説明することにする。
gitコマンドの使い方
(1)ローカルフォルダ作成からやる場合
まず、任意の作業フォルダを作成して、フォルダ内に移動する。
mkdir [ Your local git directory ]

cd [ Your local git directory ]
1. ローカルリポジトリの初期化
git init

## 確認しておく
ls -a
git config -l
git status
ls -aで、.git ファイルが表示されるはず。
2. .md/code などを作成・編集する
echo "# XXXX" >> README.md
ReadMeを作成する。
ここで、coding、各種ファイルの準備を行う。
3. インデックスへの変更ファイルの追加
git add -A
-A: git add . & git add -u を実行するオプション
4. ローカルリポジトリにファイル登録・コメント付与
git commit -m " 任意のコメント "
当分、2-4の繰り返し・・・
5. このタイミングで、新規のリモートリポジトリを作成しておく

GitHubサイトの右上の + の New repository で作成する。
6. ローカルとリモートリポジトリの関連付け
git remote add origin https://github.com/[ Your user name ]/[ Your repository name ].git

git remote -v
7. 更新ファイルをリモートリポジトリに送る
git push origin main
-u: 変更されたファイルを追加するオプション
8. リモートリポジトリが更新された場合に、変更を取得してローカルに反映する
git pull
(2)GitHubリモートリポジトリを作成してからやる場合
この場合には、リモートリポジトリをローカル環境に git cloneして、git add、git commit、git pushする。
まずは、作業ディレクトリを作成して、フォルダ内に移動する。
mkdir [ The new directory ]

cd [ The new directory ]
1. リモートリポジトリをローカルに複製して、フォルダ内に移動する。
git clone https://github.com/[ Your user name ]/[ Your repository name ].git

cd [ Your repository name ]

git remote -v
2. .md/code などを作成・編集する
3. インデックスへの変更ファイルの追加
git add -A
4. ローカルリポジトリにファイル登録・コメント付与
git commit -m " 任意のコメント "
5. 更新ファイルをリモートリポジトリに送る
git push origin main
6. リモートリポジトリが更新された場合に、変更を取得してローカルに反映する
git pull
これで、git コマンドの一連の使い方は終わりです。
ブランチ管理がしたいとかも含めて、他にも、git branch、git checkout、git rm、git reset、git revert、git merge、git rebase、git log、git diff、git fetch とかの git コマンドがあるので、 必要に応じて使いましょう。
.DS_Storeに関する補足
Macだと、ls -aでみると、.DS_Storeがあがっているとカッコ悪かったりする。
これは、Macが自動的に生成するシステム情報ファイルで、特に不要なので、
du -a | grep .DS_Store | xargs rm -rf
で、.DS_Storeを消しておきましょう。
GitHubでの personal access token(パーソナルアクセストークン)の設定
昨年くらいから、APIでのパスワード利用ができなくなっています。 そのため、アクセストークンを設定する必要があります。
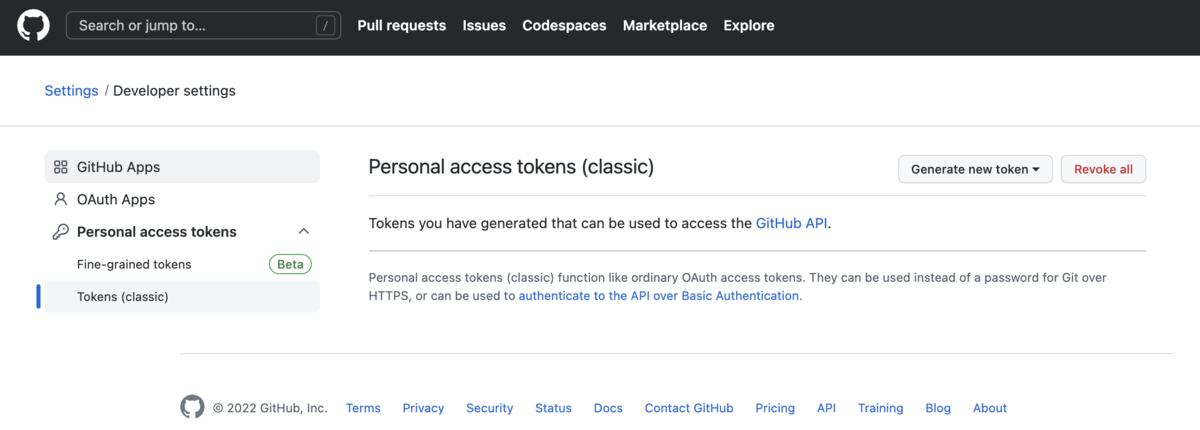
GitHubのDeveloper settingsにアクセストークンを発行するページ( https://github.com/settings/tokens )があります。 今回は、Tokens (classic)で作成しています。
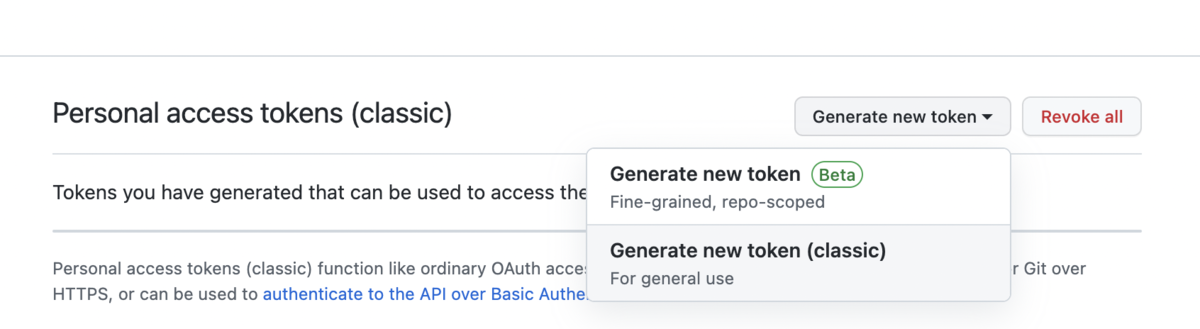
ここで、「Generate new token (classic)」を選択します。
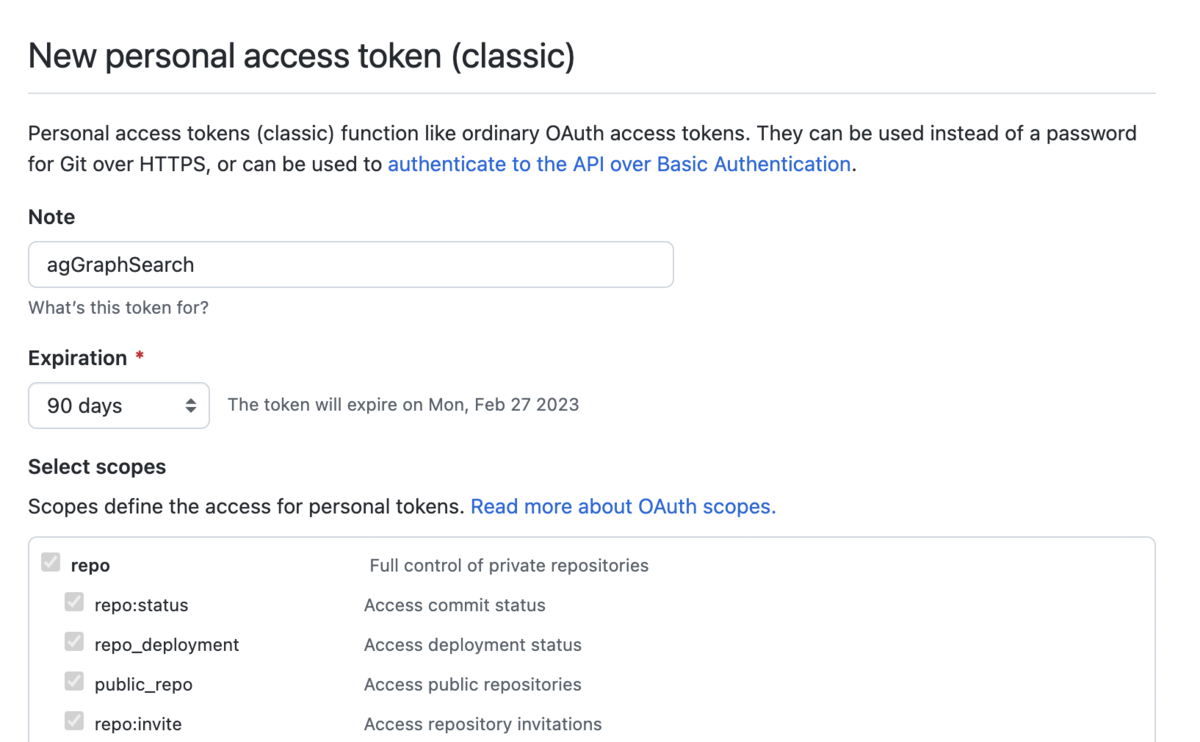
そのページで、各種の設定を行い、「Generate token」でトークンが発行されるので、それをコピーします。
「git clone [あるリポジトリ].git」でリポジトリをダウンロードすると、そのフォルダ内に、configファイル( .git/config )があります。そのconfigファイルを開けます。
#該当フォルダに移動して、開く
open .git/config

#ファイルを表示される場合
cat .git/config
以下のようなファイルになっています。
[core]
    repositoryformatversion = 0
    filemode = true
    bare = false
    logallrefupdates = true
    ignorecase = true
    precomposeunicode = true
[remote "origin"]
    url = https://github.com/[Your GitHub Name]/[Repo Name].git
    fetch = +refs/heads/*:refs/remotes/origin/*
[branch "main"]
    remote = origin
    merge = refs/heads/main
[pull]
    rebase = false
8-9行目の「[remote "origin"] url = 」のところの設定を書き換えます。
[remote "origin"]
    url = https://github.com/[Your GitHub Name]/[Repo Name].git

↓↓↓↓↓

[remote "origin"]
    url = https://[Your GitHub Name]:[Personal access tokens]@github.com/[Your GitHub Name]/[Repo Name].git
という感じに修正します。
具体的に、kumeSのagGraphSearchリポジトリであれば、以下のように記述します。
url = https://kumeS:ghp_XXXXXXXXXXXX@github.com/kumeS/agGraphSearch.git
また、以下のサイトも参考になります。
gistのインストールとログイン
gistのインストール・コマンドの実行
brew install gist

which gist
#/usr/local/bin/gist
brewコマンドでいっぱつで入る。
GitHubアカウントへのログイン*1
gist --login

Obtaining OAuth2 access_token from GitHub.
GitHub username: [Type Your username]
GitHub password: [Type Your PW]
Success! https://github.com/settings/tokens
うまくいっていければ、HOMEディレクトリ .gistにアクセストークンが作成される。
当然、事前に、GitHubのアカウントを持っているのが前提。
gistコマンドの使い方
Step 01 ファイルのアップロード
基本形
gist -d "・・・" [File path] -f [Other name]
-f: 別名を付けて、アップロードする-d: 説明"・・・"の追記
基本形2 アップロード後すぐに、URLを開きたい場合
gist -o -d "・・・" [File path] -f [Other name]
-o: ブラウザでURLを開く
Step 02 gistの一覧表示 & ファイルIDを調べる
自分のgistの一覧表示は、-lオプションで行う。
gist -l
gistのファイルごとのIDは、gist -l で出力される英数字の文字列を指す。
例えば、https://gist.github.com/ 8c49fc30f5b01ab8a5219343c9820063 の部分
(補足)他人のgistの一覧表示 は、gist -l USER_ID で行う。
Step 03 ファイルをUpdate(更新)する場合
基本形1
gist -u [URL or ID] [File path]
ただ、ローカルのファイル名とGistのファイル名が違う場合には
基本形2
gist -u [URL or ID] [File path] -f [The File name to replace]
大体の場合、こっちになると思う。
[URL or ID]については、例えば、
URLの場合、https://gist.github.com/ 8c49fc30f5b01ab8a5219343c9820063
あるいは、IDの場合、8c49fc30f5b01ab8a5219343c9820063
と表記する。
補足
gistコマンド実行のバッチファイル
毎回修正後のファイルをコマンドでアップロードするのも面倒なので、 コマンド実行のバッチファイルを作っていもいいかもしれない。
テキストエディターで、例えば、GIST.command とかいうファイルを作成する。 そこに、以下のコマンドを書いておく。
#!/bin/bash

MY_DIRNAME=$(dirname $0)
cd $MY_DIRNAME

gist -u [gist ID] -o [アップロードするファイル名] -f [gist上にアップロード済みのファイル名]

exit
次に、chmod +x GIST.commandで実行権限を与えておく。
そうすれば、commandダブルクリックでファイルをアップロードして、ウェブページも開いてくれる。
GitHubリポジトリをローカル環境にクローンする
gitコマンドの基本は、git cloneだろう。これでほしいリポジトリがダウンロードできる。
git clone [ `GitHubリポジトリのhttps URL (.git)` ] [ 任意のフォルダ名(省略可) ]
例えば、アノテーションツールである labelme-Image Polygonal Annotation with Python- をクローンする場合。
git clone https://github.com/wkentaro/labelme.git LabelME
作業ディレクトのLabelMEフォルダ内にダウンロードされるはず。 例えば、私が作成している、DLに関するリファレンス集であれば、
git clone https://github.com/kumeS/DLimageSegmentation
R上で実行する場合の命令文
Rを使っていると、ターミナルを立ち上げてというのも面倒になり、 Rからgit・gistコマンドをやりたくなる。その場合には、
system( 'gist -d "・・・" [File path] -f [Other name]' )
と、system( '...' ) or system( "..." ) 内にgit & gist コマンドを記述して、 R上で打てば良い。
git コマンドのヘルプ
git --help

usage: git [--version] [--help] [-C <path>] [-c <name>=<value>]
           [--exec-path[=<path>]] [--html-path] [--man-path] [--info-path]
           [-p | --paginate | -P | --no-pager] [--no-replace-objects] [--bare]
           [--git-dir=<path>] [--work-tree=<path>] [--namespace=<name>]
           <command> [<args>]

These are common Git commands used in various situations:

start a working area (see also: git help tutorial)
   clone             Clone a repository into a new directory
   init              Create an empty Git repository or reinitialize an existing one

work on the current change (see also: git help everyday)
   add               Add file contents to the index
   mv                Move or rename a file, a directory, or a symlink
   restore           Restore working tree files
   rm                Remove files from the working tree and from the index
   sparse-checkout   Initialize and modify the sparse-checkout

examine the history and state (see also: git help revisions)
   bisect            Use binary search to find the commit that introduced a bug
   diff              Show changes between commits, commit and working tree, etc
   grep              Print lines matching a pattern
   log               Show commit logs
   show              Show various types of objects
   status            Show the working tree status

grow, mark and tweak your common history
   branch            List, create, or delete branches
   commit            Record changes to the repository
   merge             Join two or more development histories together
   rebase            Reapply commits on top of another base tip
   reset             Reset current HEAD to the specified state
   switch            Switch branches
   tag               Create, list, delete or verify a tag object signed with GPG

collaborate (see also: git help workflows)
   fetch             Download objects and refs from another repository
   pull              Fetch from and integrate with another repository or a local branch
   push              Update remote refs along with associated objects

'git help -a' and 'git help -g' list available subcommands and some
concept guides. See 'git help <command>' or 'git help <concept>'
to read about a specific subcommand or concept.
See 'git help git' for an overview of the system.
gist コマンドのヘルプ
gist -h

Usage: gist [-o|-c|-e] [-p] [-s] [-R] [-d DESC] [-u URL]
                          [--skip-empty] [-P] [-f NAME|-t EXT]* FILE*
       gist --login
       gist [-l|-r]

        --login                      Authenticate gist on this computer.
    -f, --filename [NAME.EXTENSION]  Sets the filename and syntax type.
    -t, --type [EXTENSION]           Sets the file extension and syntax type.
    -p, --private                    Makes your gist private.
        --no-private
    -d, --description DESCRIPTION    Adds a description to your gist.
    -s, --shorten                    Shorten the gist URL using git.io.
    -u, --update [ URL | ID ]        Update an existing gist.
    -c, --copy                       Copy the resulting URL to the clipboard
    -e, --embed                      Copy the embed code for the gist to the clipboard
    -o, --open                       Open the resulting URL in a browser
        --no-open
        --skip-empty                 Skip gisting empty files
    -P, --paste                      Paste from the clipboard to gist
    -R, --raw                        Display raw URL of the new gist
    -l, --list [USER]                List all gists for user
    -r, --read ID [FILENAME]         Read a gist and print out the contents
        --delete [ URL | ID ]        Delete a gist
    -h, --help                       Show this message.
    -v, --version                    Print the version.
参考資料
*1:どうも、--loginコマンドでtokenが生成されるのは2020年末で廃止になるらしい。 We will remove the Authorizations API endpoint on November 13, 2020. If you accessed the API via password authentication, then we recommend you use the web flow to authenticate.